
In the first article of this mini-series, we configured the master node and kubectl on our PC, now it’s time to configure the worker nodes and join them to the cluster, here’s the final state with my hostnames and IPs:

Operating System Preparation#
Similar to the previous article, we will go through some basic O.S. configuration and then start the installation of K3s on the new node. Since those steps were already explained in the first post of the series, I will only show the relevant command to execute, if you want to get more details about what those commands do, please refer to the first article of the series.
OS & Packages updates#
SSH into the Raspberry PI using either the
ssh user@hostname.domainformat (if you don’t have a domain configured you can use thehostname.local, for me for example it’sssh pi-node-02.local) orssh user@ip-addressUpdate apt packages & OS using the following commands:
sudo apt-get update -y
sudo apt-get upgrade -y
sudo apt-get dist-upgrade -y
sudo apt --fix-broken install -y
sudo apt autoremove -y
sudo apt autoclean
More information on what is the local domain and how it works can be found here
Configure a static IP on the Raspberry PI#
nmcli con show
connetion={add your connection name here}
sudo nmcli con mod $connection ipv4.method manual ipv4.addr 192.168.2.202/24 ipv4.gateway 192.168.2.254 ipv4.dns "192.168.2.59 1.1.1.1"
sudo reboot
Please note that 192.168.2.59 is the IP of my Pi-Hole used as my dns resolver
Configure the kernel to enable cgroup v2#
echo ' cgroup_memory=1 cgroup_enable=memory' | sudo tee -a /boot/firmware/cmdline.txt
sudo reboot
Verify cgroup v2 is enabled#
pi-adm@pi-node-02:~$ grep cgroup /proc/filesystems

nodev   cgroup
nodev   cgroup2 <-- This tells us that cgroup v2 is enabled
Worker node installation#
The worker node installation is similar to the master node one, we still have to run the k3s install script, but we will change some parameters, we need to tell K3s that’s going to act as a worker and what the master node IP is, let’s see how here below:
SSH into your Raspberry PI master node using
ssh user@hostname.domainorssh user@ip-addressCopy the master node token displayed using the following command:
sudo cat /var/lib/rancher/k3s/server/node-tokenSSH into the worker node using
ssh user@hostname.domainorssh user@ip-addressPrepare K3s kubelet configuration file in
/etc/rancher/k3s/kubelet.configkubeconfig=/etc/rancher/k3s/kubelet.config sudo mkdir -p $(dirname $kubeconfig) sudo tee $kubeconfig >/dev/null <<EOF apiVersion: kubelet.config.k8s.io/v1beta1 kind: KubeletConfiguration shutdownGracePeriod: 30s shutdownGracePeriodCriticalPods: 10s EOFSet the variable
MASTER_TOKENwith the value of the node token copied from the server in step 2export MASTER_TOKEN=K10....Set the variable
MASTER_IPwith the IP of the master nodeexport MASTER_IP=192.168.2.201SSH Into the worker host and Install K3s using the command below:
curl -sfL https://get.k3s.io | K3S_URL=https://$MASTER_IP:6443 \
  K3S_TOKEN=$MASTER_TOKEN sh -s - --node-label 'node_type=worker' \
  --kubelet-arg 'config=/etc/rancher/k3s/kubelet.config' \
  --kube-proxy-arg 'metrics-bind-address=0.0.0.0'
Installation Parameters#
Let’s now look at all the parameters that we specified in the command line:
K3S_URLIs used to specify the address of the master node, this also assumes it’s an agent installation (as opposed to a server one)K3S_TOKENThis is the token we copied from the K3s master node that will be used by K3s to join the cluster--node-label 'node_type=worker'This is a random label that we add to the node, label name and value are completely up to you and can be omitted--kubelet-arg 'config=/etc/rancher/k3s/kubelet.config'Specify the location of the kubelet config file (the one we generated in the previous step)--kube-proxy-arg 'metrics-bind-address=0.0.0.0'Bind on all addresses to enable metrics scraping from an external node
Verify worker node installation#
If everything is configured correctly, from our machine we should now be able to see the new node added to our cluster:
kubectl get nodes
NAME                  STATUS   ROLES                  AGE    VERSION
pi-node-01            Ready    control-plane,master   20m   v1.29.5+k3s1
pi-node-02            Ready    <none>                 20s   v1.29.5+k3s1
If you want to change the role from <none> to worker, we need to add a label to the node, which can achieved via the following command:
kubectl label node pi-node-02 kubernetes.io/role=workerPlease note that’s not possible to specify the label kubernetes.io/role=worker at K3s installation time using the parameter --node-label.
The installation will result in an error, thus we have to manually label the node after the installation
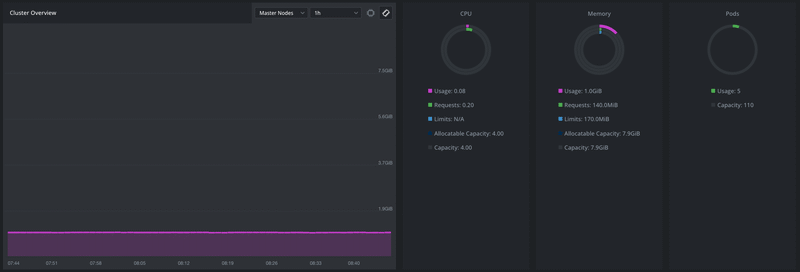
Lens Metrics#
If you’re using Lens, the Kubernetes GUI, you can configure the metrics displayed in the cluster overview page to display information about your cluster, like memory usage and CPU usage as shown in the picture below:
Install Prometheus with the following commands
helm repo add prometheus-community https://prometheus-community.github.io/helm-charts
helm repo update
helm install prometheus prometheus-community/prometheus --namespace monitoring --create-namespace
Configure lens metrics to use Helm
Specify the Prometheus service address
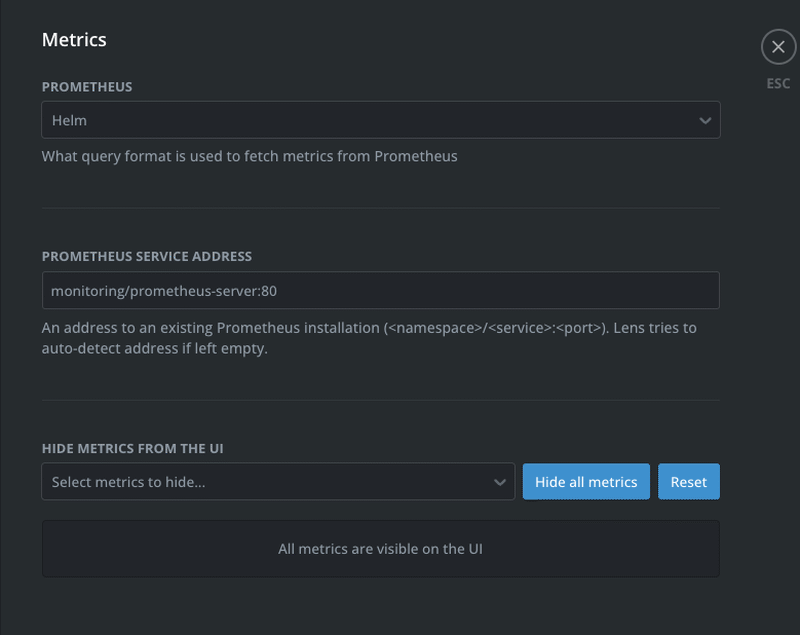
In Lens, from the catalog, go to the cluster setting -> Metrics and set the Prometheus service address to monitoring/prometheus-server:80 as shown below:
Conclusions#
That’s all it takes to add a K3s node to an existing cluster, if you have multiple nodes, you can simply repeat those steps multiple times. So far we installed a multinode cluster, so only implemented the first of the features discussed in the first post, in the next post of the series though we will start to implement the other capabilities.
See you in the next post!
Hero Image generated by Bing Copilot